Lighting a Hanok: How to Illuminate a Ceiling You Refuse to Hide
Exposed rafters forbid the usual tricks — no flush mounts, no dropped ceilings, nowhere to hide a wire. Our solution: perimeter light boxes throwing downlight below and rafter-glow above. The full hanok lighting playbook, from wiring to warm white.
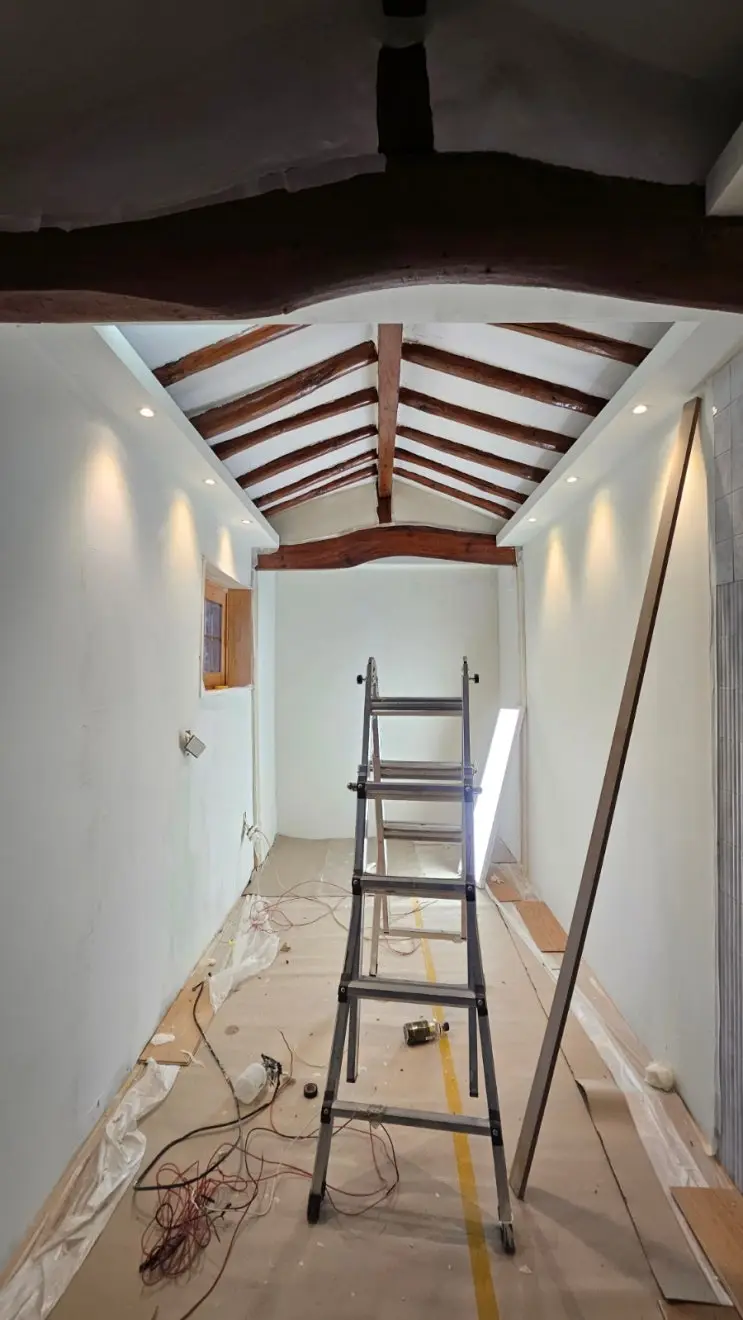
The problem stated us in the face every evening of the renovation: we had spent a season grinding, staining, and masking to expose the 1956 rafters — and every conventional lighting plan would punish that work. A flush ceiling mount has nowhere flush to mount. Pendant cords crossing the rafter field read as clutter. And the brutal one: a single bright source at the center turns sculptural timber into a dark silhouette against its own glare.
Hanok lighting is its own discipline. Here’s the playbook we assembled — from electricians, one veteran stay operator, and a large number of evenings standing in the dark, squinting.
The core move: light from the edges, in two directions
The solution that organizes everything else is the perimeter light box (deungbakseu in Korean site slang): a built wooden channel running along the ceiling’s edge, where roof meets wall — carpenter-framed, puttied, and painted with the room. It solves three problems in one piece of joinery:
- Wiring vanishes inside it. Every cable in the room routes through the box — the reason we combed all our CD conduits flat against the wall lines before the carpenters arrived.
- Downlights fire from it, downward. Recessed spots along the box’s underside light the floor-living zone — tables, bedding, tasks — without a single fixture crossing the rafter field.
- LED strips fire from it, upward. Grazing light washes across the rafters and white bays, revealing the timber’s relief the way museum lighting reveals a carving. The ceiling becomes the room’s chandelier.
The night we first switched both layers on — pools of warm light below, the rafter-rhythm glowing above — was the single most photographed moment of our build. The plan drawn in March worked exactly as drawn, which happens rarely enough to celebrate.
The rules that fill out the system
- Warm white, everywhere, no debates. The mentor’s doctrine covered paint and lumens alike: hanok materials — stained wood, clay tones, warm-white walls — collapse under cool light. Every lamp in the house sits at the amber end.
- Standing lamps are furniture-grade lighting. Movable floor lamps in corners style the space, serve floor-sitters at the right height, and (the operator’s cynical-but-true point) transform guest photography — which is marketing you don’t pay for.
- Layer count beats wattage. Downlights + strips + standing lamps + one dining pendant, each modest, each switchable — evenings scale from bright to bath-adjacent dimness. One powerful source can’t do that, and in a rafter room it also can’t be placed.
- Automate the transitions: a motion-sensor strip in the gate bay greets night arrivals hands-free — luggage, dark, no switch-hunting.
- Buy where Seoul buys: Euljiro’s lighting district, where our pendant and exterior lamps cost ₩320,000 total after the kind of comparison shopping the district exists for.
The wiring truths underneath
None of the above works without the invisible layer, and our scars say: plan electrical first, in embarrassing detail. It’s the trade that touches every other — each lighting idea, appliance, and AC unit generated new runs, and we kept re-opening finished work. The main line crossing the annex ceiling needed a certified live-line specialist to reroute; one late cable got buried by grinder-cutting a channel into a finished wall (shop-vac held at the blade — the dust trick that made it civilized); and everything passed the national electrical inspection only after we swapped two breakers whose fine print (rated non-operating vs sensitivity current) we’d never have caught unaided.
Light is the last thing installed and the first thing guests feel. In a hanok it’s also the difference between a ceiling that performs every evening and one that merely exists overhead. Ours performs. It cost a season of conduit to buy those two switches.
The lighting thread: box design in #27, carpentry in #45, the skim-coat finish in #54, first full illumination in #68. The ceiling being lit: Exposed Rafters.
Questions we actually get
How do you light a room with exposed rafters?
Indirectly, from the edges. The standard hanok solution is a perimeter box (a built wooden channel along the ceiling's edge) that conceals wiring, holds recessed downlights firing downward, and carries LED strips washing light UP across the rafters. The structure gets lit as a feature instead of silhouetted.
What color temperature suits a hanok interior?
Warm — always warm. Stained timber, white plaster bays, and clay tones die under cool white light. Our mentor's rule covered paint and light alike: warm white for hanok, no exceptions. Layered warm sources (downlights + indirect strips + standing lamps) beat one bright ceiling fixture.
Can you add modern wiring to a hanok without visible cables?
Yes, but plan it early — it's the trade that touches everything. Our runs hide inside the perimeter light boxes, behind wall insulation boards, and in one case in a channel grinder-cut into a finished wall. The main line crossing the ceiling needed a live-line specialist to reroute.